

You’d be forgiven for thinking, as a co-host of #sewtogetherforsummer, that I’ve sewn a dozen shirtdresses before but…no. The Challenge was very much designed around the idea of encouraging us to dig deep into our pattern stashes and surface with a project kept on a back-burner for far too long. I’m certainly no exception – the closest thing I’d even sewn to a shirt, prior to this, was the top of the Carolyn Pajamas !

McCalls 6696 was one of my #2017MakeNine picks – as a pattern, it’s achieved almost iconic status. I know so many of you have it too. I like its classic design, with its full or straight skirt, back yoke and gathers, several sleeve options and, thanks be to the McCall pattern drafting gods, pockets too! However, my predominant reason for choosing this pattern was the fact that there are several front bodice pieces, each drafted for a different cup size. Although I’ve just about got to grips with doing Full Bust Adjustments, it’s great when the work is done for you. Unless that is, as I later discovered, you make a total boob of a mistake, as I did!
I duly took and noted down my measurements as instructed, deducting my High Bust measurement from my Full Bust measurement to determine which bodice piece I needed to trace. I also studiously noted down that I needed pattern bodice piece 2, drafted for a C cup. I then proceeded to cut out bodice piece No. 3 drafted for a ‘D’ cup. Because I’m ‘clever’ like that. I understand why I did so, the boobs have shrunk a bit recently – and whilst I thought I knew this, clearly my subconscious has not yet read the memo.
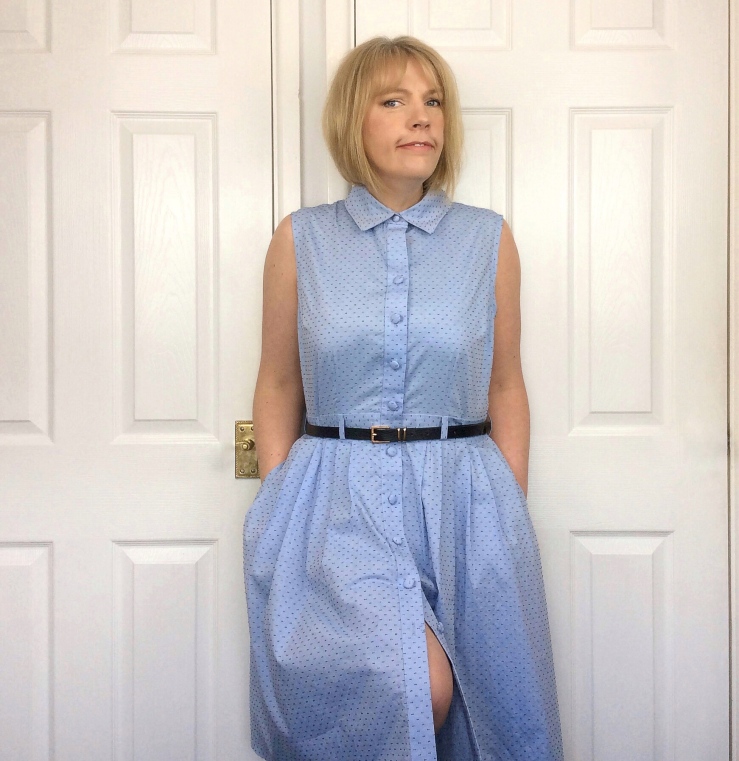
I’d been sewing merrily away (I used this Swiss Dot fabric), blithely unaware and throughly enjoying myself, sewing most of the dress together before trying it on. And then I stood in front of the mirror, mouth no doubt agape, just taking stock of its…vastness! It took me a while to figure out exactly what had happened because the whole dress felt big not just the bodice front – that just felt especially big. Later that evening, after pondering put me at risk of a sleepless night, I got up and compared my traced pattern pieces to the originals, whereupon I finally clocked my mistake.
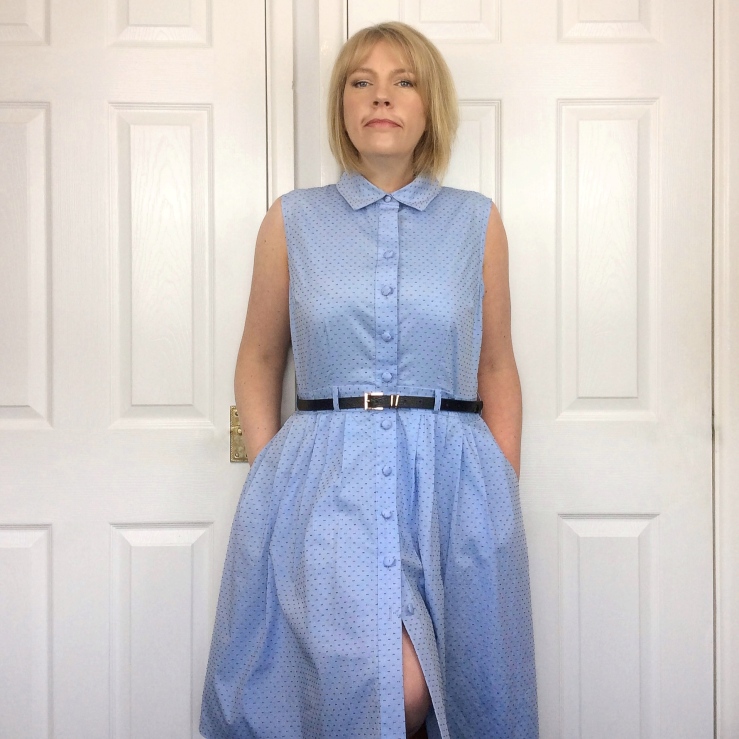
I tried it on again the next morning. Cutting out the wrong bodice piece alone clearly didn’t account for all the extra fabric I was swathed in. Let me take off the (too narrow) belt to fully show you…
I altered the bust darts retrospectively in an, only moderately successful, attempt to take out some of the excess, but the armhole is at approximately 0.75″ too low (hello bra!) and I can pinch out well over 3” at the side seams. Even taking out a 1.5” wedge from the centre back prior to starting in order to reduce the risk of the gathers pouffing, has still left me with issues there.

Now all this might seem a bit doom and gloom but … not really! Y’see I really feel like I’ve learned something about fit with this dress. First of all, I’ve got to start thinking of myself as the size I am now (subconscious: read the memo!), cutting out patterns based on the finished measurements that I want. I confess, I couldn’t find the finished measurement information on the envelope or the instructions, plainly missing the little icon/chart on the pattern pieces themselves!
And/or I’ll measure the flat pattern pieces (e.g. to get the bust measurement I would measure front and back bodice pieces at the bust point, add them together and then deduct all seam allowances to get the finished measurement). Looking at the pattern pieces for this dress I can clearly see now where I was only partially sighted before… that the bust circumference on my traced pattern pieces for this dress resulted in 5.5” of excess. Even after taking away an allowance for ease, that’s still a whopping 3.5” more fabric than I’d wanted!
So I’m not at all sorry that my first 6696 is more akin to a tent than a dress! The mistakes were mine but so are the lessons learned. I’m happy!
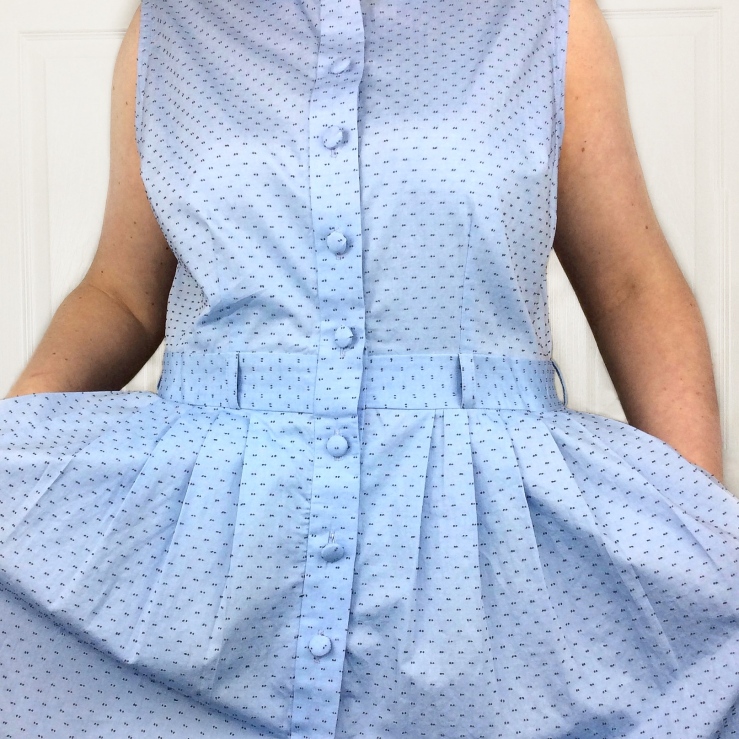
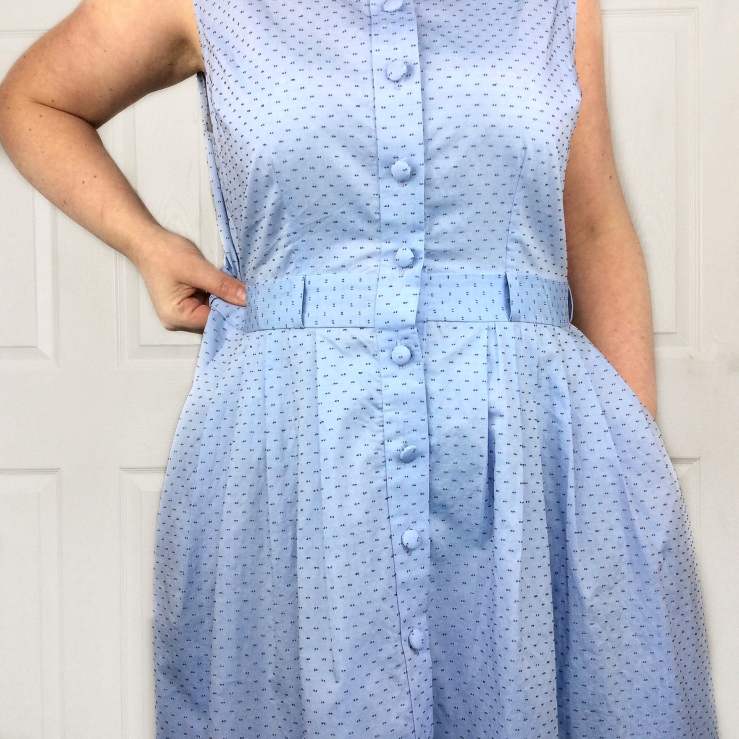
As for the pattern itself, I love it! It’s got a slightly 90s retro vibe. I like how the knife pleats are drafted, so that they’re wider at the side seams and centre back so the skirt lays flatter at those points. I love the back yoke and the gather details. The instructions are clear but not handy-holdy. Oh, I did lengthen the carriers (belt loops) piece so as to make 6 loops not 4.
I didn’t attempt the ‘burrito method’ of stitching together the yoke pieces which resulted in a bit of hand sewing; in fact there’s quite a lot of slipstitching involved with this dress, to the point mine had seriously improved by the end!
The collar and collar stand are not difficult to construct although I am keen to try other methods and I’ll certainly topstitch at least the collar stand next time. If collars bother you, we do have a specific collar post HERE.


I had a lot of fun self-covering my buttons using my new little Prym gadget and putting all I learned from our Sewing Buttonholes : Tips n Tricks post to get a lovely finish to my buttonholes. This dress needs another button at the top but I’m done with it now!


So, whilst the dress is a fail in itself, it has been a great sewing experience and I am itching to put into practice all that I’ve learned for Round Two! (EDIT: I did it! See here)
Tell me, what is your best fitting tip?
Until next time,


Thank you so much! It’s a great pattern isn’t it! Sounds like you made great use of repurposed fabric!
LikeLike
I love this pattern, I have made it 4 times! The last time I used some M&S blue and white toile-de-joey curtains from a charity shop! Fabulous fit.
LikeLiked by 1 person
[…] Want to see my journey sewing the iconic McCalls 6696 shirtdress? Click here and here […]
LikeLike
[…] McCalls 6696, what a bout we’ve had! You may recall that I documented Round One with this dress? It ended with me, well, losing … resulting, as it did, with a garment […]
LikeLike
[…] Until next time, (when I’ll hopefully surface with a well fitting pair of Pedal Pushers or a new and improved McCalls McCalls M6696 Shirtdress). […]
LikeLike
Thank you so much! 😘It is a shame but these things happen I guess and I’ve learned a lot from it so I’m happy 😉😘
LikeLiked by 1 person
Oh what a shame it’s too big! It still looks beautiful and I’m looking forward to seeing round two 🙂
LikeLiked by 1 person
Thanks, I guess these things happen sometimes eh! And major thanks for the link; I’ll definitely be checking that out – cheers lovely!!! Xx
LikeLike
Such a shame as the fabric is perfect for it. I bought the pattern ages ago and even traced it off and read loads of posts but nicer fit round to it. I really must make an effort and get going. Whilst ‘researching’ this make u read this blog post which help you fitting your next – https://sewniptuck.com/2016/05/21/stop-right-there-dont-cut-mcalls-6696-till-youve-read-this/
It’s really good advice and I know Sew South London used it when she made hers and it’s fab!
LikeLiked by 1 person
[…] tricks to sewing the perfect collar – I can’t wait to have another go at my McCalls 6696 Shirtdress so that I can incorporate some of these fantastic tips […]
LikeLike
Ah that’s good to hear Charlotte! It is sometimes hard to allow ourselves to make mistakes isn’t it but I find it’s actually the best way I learn!! Are you planning on making this pattern? Either way, let me know how you get on!! Xx
LikeLike
Enjoyed reading this! I’m afraid to start into my shirt dress as I’m afraid of making a total mess of it but after reading this, it’s given me a bit of encouragement 😊
LikeLike
Thank you Alex! Its definitely a lesson learned; i will absolutely do the tissue fitting too – making muslin feels like such a chore sometimes doesn’t it when you just want yo actually get on and sew! I’m so glad to hear you’re planning a Shirtdress fir the Challenge too but yes, the list of things to sew on,y ever gets longer doesn’t it!! Loved your red jumpsuit by the way 😉 xx
LikeLiked by 1 person
It’s still such a great dress, what beautiful fabric! I am planning on joining the challenge, but still so much on my sewing list that I need to finish.
In terms of fitting, you’ve definitely highlighted some of my methods, like looking at the finished measurements, and I usually do that rather than the body measurements on the envelope. I sometimes do a quick tissue fit, i.e. pin the tissue itself incl. darts etc and try it on before cutting the fabric. This will show any obvious sizing issues. As I hate making muslins, unless I really really have to, I’s rather do that than cut and sew fabric.
Looking forward to a new and improved version. And I’m sure you’ll find someone for whom this lovely dress will be perfect, they would love such a great gift!
LikeLiked by 1 person
Thanks Lynsey! The fit changes you’ve made sound 👌🏻- exactly the ones I plan on doing next time around 😂sooo happy you’re joining in too xxx
LikeLike
Loving the fabric, it’s a fab start and it looks good with a belt. Ive been muslining it in an old duvet and made some changes, the waist was too big, the back poof removed, moved darts etc. I think it will become a great dress and I get to join in my first # on Instagram ☺️
LikeLiked by 1 person
Thanks Emma!! Oh I so happy you’re going to make one! I’m very much taking the attitude ‘if at first you don’t succeed…retry, toile and make again!’ 😉😘
LikeLiked by 1 person
Thank you Clemence!! I’m glad it’s not just me! 😉😘
LikeLike
Looks lovely. That blue is a lovely colour. I’m definitely going to try a shirt dress but I’m nervous because RTW ones never fit right so I hope it works out… I’ll be basting and trying on etc, something I don’t usually do, after hearing your disappointment. Great post though. 🙂
LikeLiked by 1 person
It still looks very cute even with the fit issues! I also tend to cut the size I think I am than the size I actually am…
I love the covered buttons, they are delightful!
LikeLiked by 1 person
Thank you Suzy!!! 😘😘 funny how we both ended up not quite getting the fit we wanted; the law of averages says we will get it right next time!! Does yours just give you an extra sexy wiggle?! 😉😘
LikeLike
Fab post Sarah…really amusing and upbeat. It is a pity about your dress, but at least you want to make it again. I suppose you could take it all to bits and recut, but nah! I wouldn’t either! Thank you for sharing this, we have all learnt a lot from your experience. I’m going to measure pattern pieces too from now on. I use the pinch and pleat method when sewing for other people and allow bigger seam allowances too. This pattern is tricky to fit though, as until it’s finished you can’t really tell..mine is a little tight on the hips. I’m debating whether to let out the side seams a bit or give it away. Thank you…Great post.
LikeLiked by 1 person
I too thoroughly enjoyed your post – it was fun to read and like Amanda said just the sort of mistake I make – I will do a FBA forgetting to take into account the extra fabric that’s going to bring all the way up the front and find myself swimming in it. I just learned this pinch and pin method from our in person Sewing Goddess Teacher Fern here in Victoria BC. She is a marvel that offers us a whole day class once a month and I think the most profound lessons I and everyone else in the class has learned from her is fitting. She is Palmer/Pletsch Certified and considering that she’s now in her ’70’s and has been sewing for probably at least 50 of those we’re so fortunate to have her 🙂 I love your fabric choice and you’ve given me a great idea on a shirt/tunic I’m just finishing in liberty cotton lawn! I have that doo dad from Prym and some buttons too!
LikeLiked by 1 person
Thanks Amanda love! Yes, pinch and pin!!! I need to get better at that too and then there’s trying to transfer those changes to the pattern pieces afterwards!!! My brain’s getting tired!! 😂😂😘
LikeLike
Ha Ha!!!!! Love this post. This is the kind of mistake I would make!!!! My favourite fitting tip is try it on inside out and “pinch and pin” that’s what I do anyway and it is the only way I know how. Good luck with your next one Sarah.
Amanda xxxx
LikeLiked by 1 person