
Struggling with sewing buttonholes? Here’s a post full of tips and tricks to get you confidently sewing buttonholes; to give you a really comprehensive overview, I’ve drawn on a wealth of knowledge from sewing friends, the very knowledgeable Diane of Dream.Cut.Sew and Suzy @sewing_in_spain!
Let us start by saying, as with all things sewing, the fear of any new technique is often far worse than the actual process itself! ‘The only way around is through’ as the saying goes and I believe that good preparation and practice are key to routinely sewing successful buttonholes.
(If you’re looking for a tutorial on Bound Buttonholes; I have a separate post on those HERE).
Prep : Interface!
First of all, make sure that the area you’re doing the buttonholes is properly interfaced for stability. Your practice piece of fabric also needs to have the same interfacing and amount of fabric layers as your actual garment so that you get a good final result.
The Automatic Buttonhole
Now, some machines have a 4 to 6 step buttonhole dial and others have an automatic butthonhole setting(s) that work in conjunction with the long buttonhole foot attachment – which cleverly measures and determines your buttonhole length from the button held in it. However, it isn’t infallible, getting the right length for a domed button for instance…so we’ll address that problem too in a moment!
Check your own machine’s User Manual, but in general this is how they work:
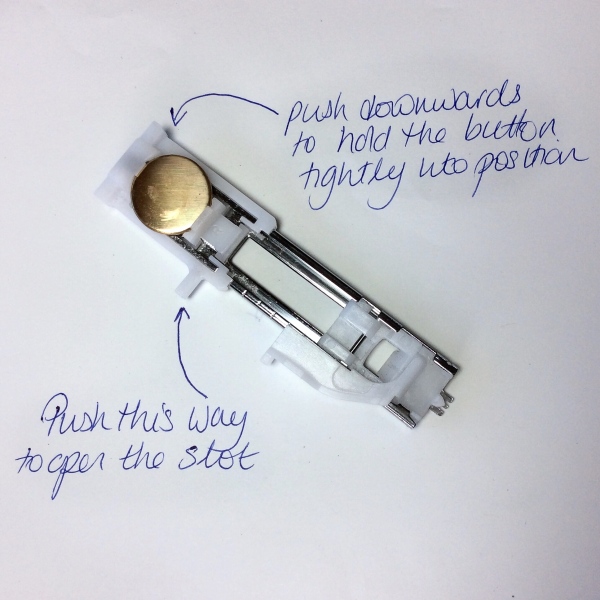
First, choose your button! Put it into the designated slot in your foot and make sure that the holder is pushed up tight against the button and that the button itself is laying flat. If your button is domed, you will need to insert a flat button larger than the button you will actually be sewing onto your garment … see below on how to choose the correct size!
Then attach the foot to your machine (with the button at the back) and position your needle over your first mark. Mine stitches the bottom bar first then sews up the left channel, top bar and back down the right hand side to finish at the starting position.
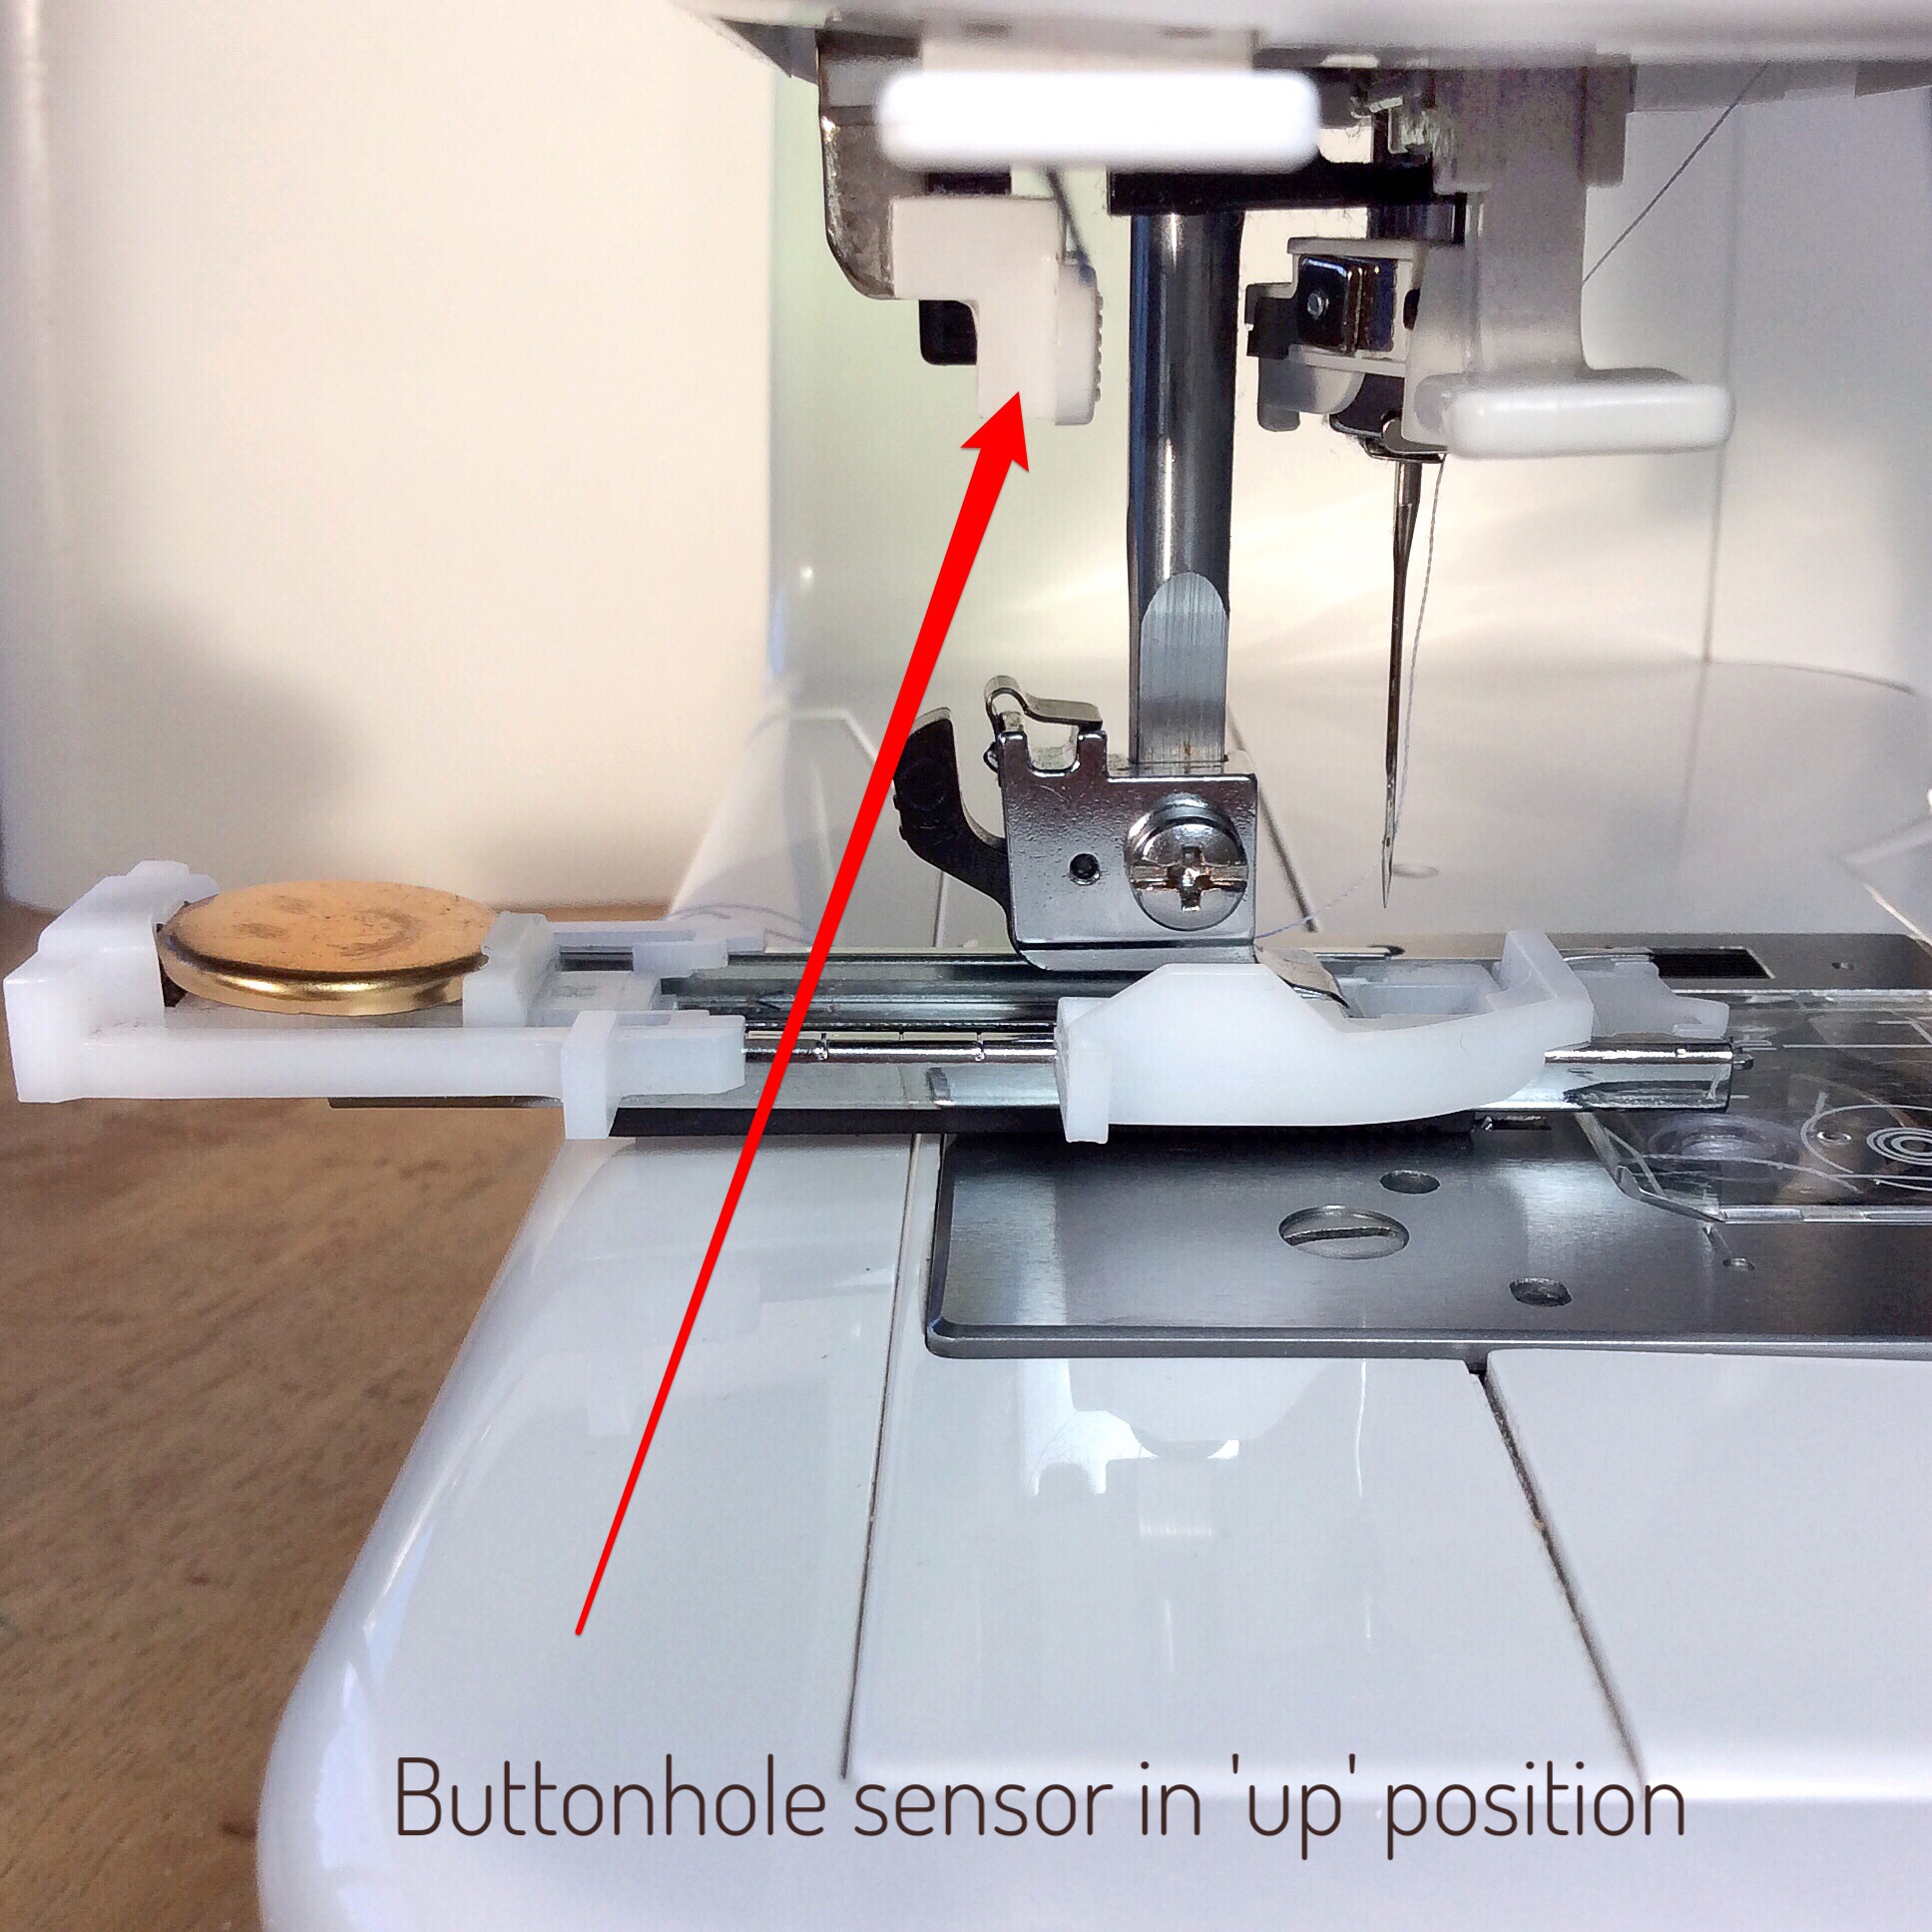
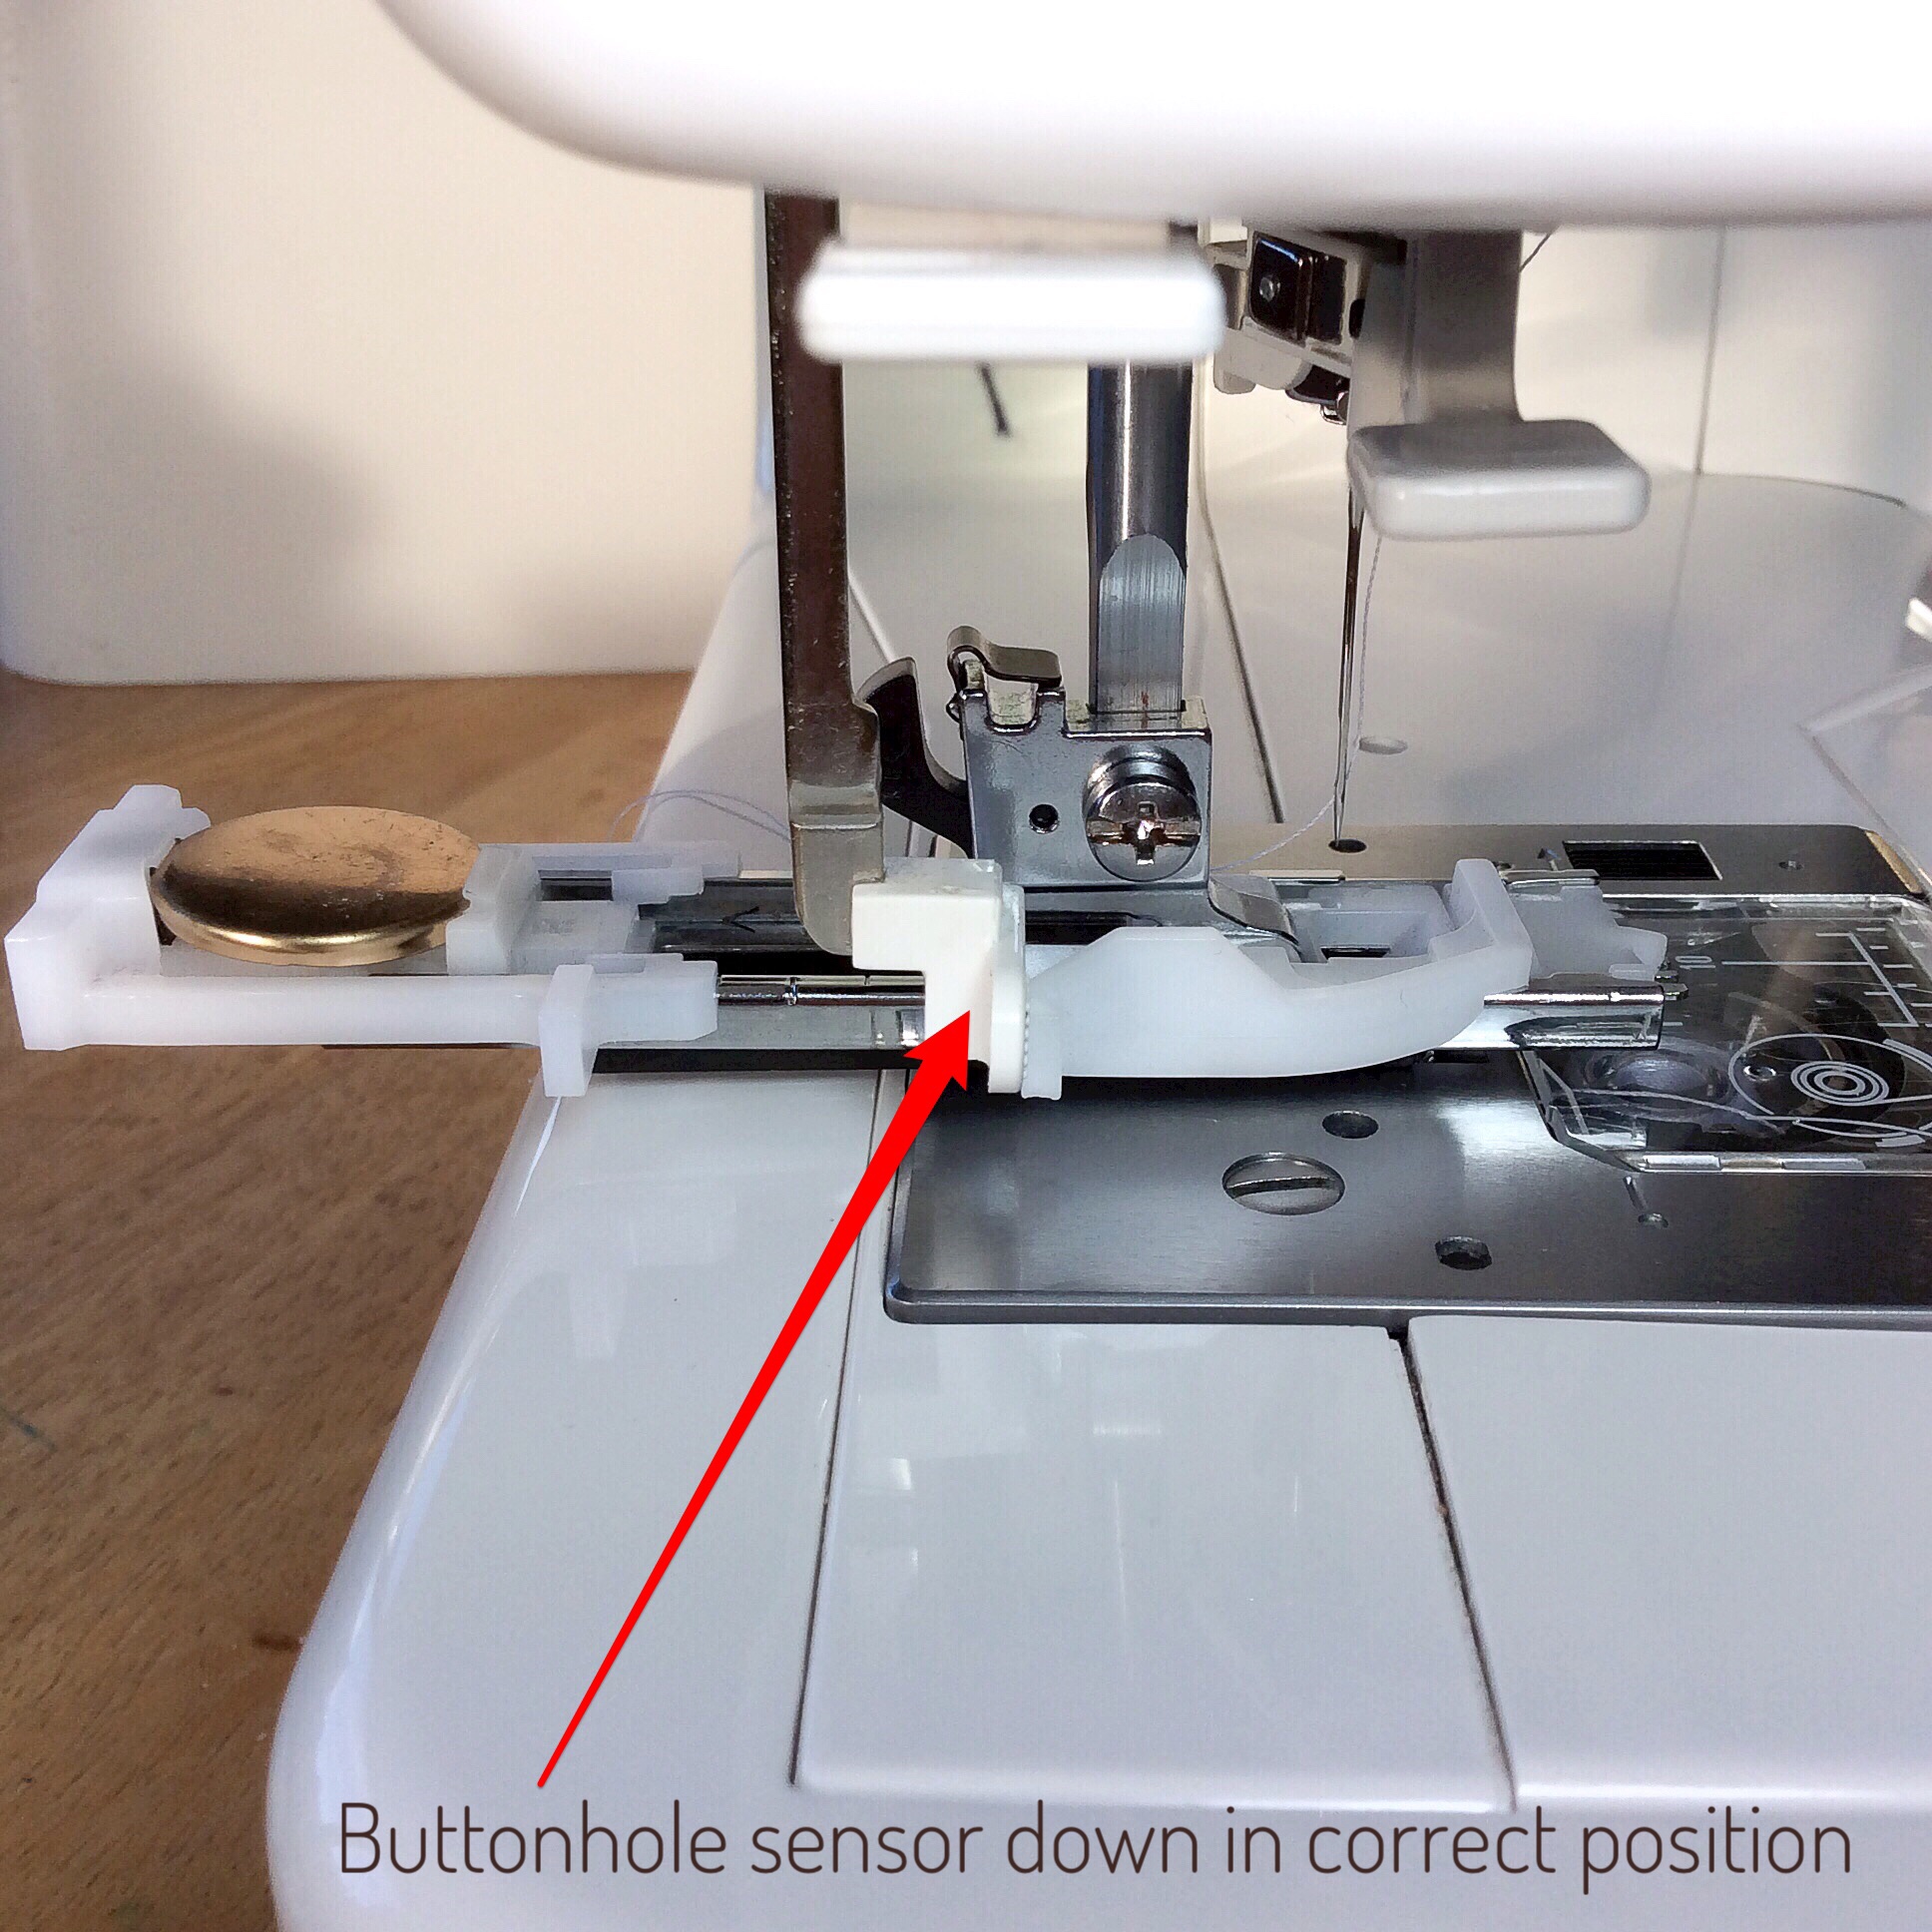
Before you start sewing it is vital that you have pulled down the buttonhole lever/sensor located on the left hand side. This works in tandem with your buttonhole foot to determine the size of the buttonhole your machine will produce. And sew away! I have to click to ‘reset’ my machine after each buttonhole so that it doesn’t get confuddled. (I could do with a reset button myself too sometimes!)
Marking and Measuring
Using either a special fabric pen that wears, irons or washes away, chalk, or basting thread, mark the position and length of your buttonholes (I like the Chaco Chalk Liner or a Frixon Pen). Note: the buttonhole markings on a pattern are there for position only and not to indicate the length of your finished buttonhole….they are either vertical or horizontal on the centre line. Horizontal markings always cross the CF line to account for the button shank/thread and the end of the buttonhole.
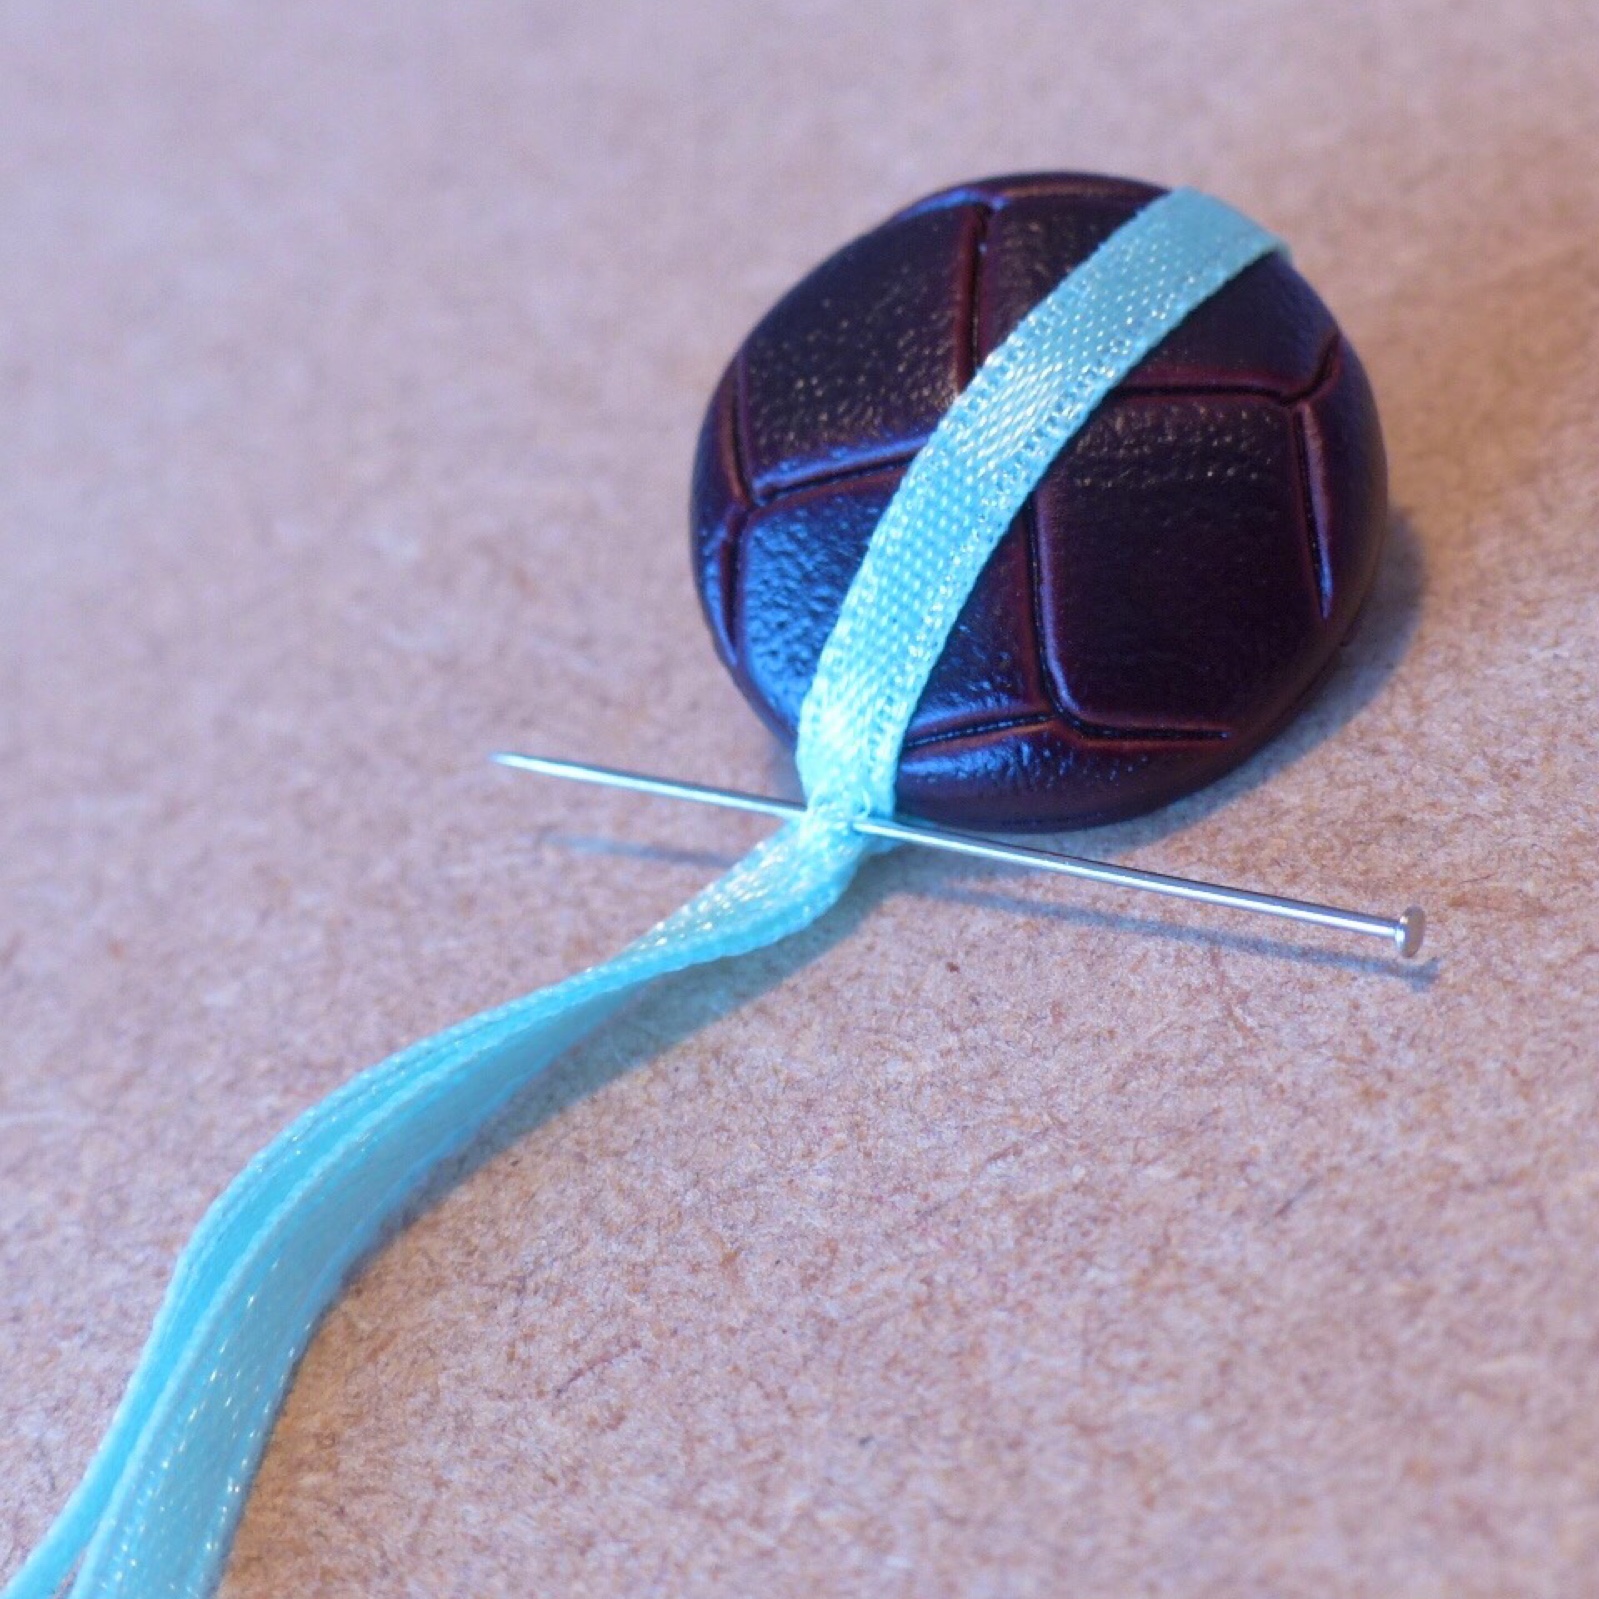
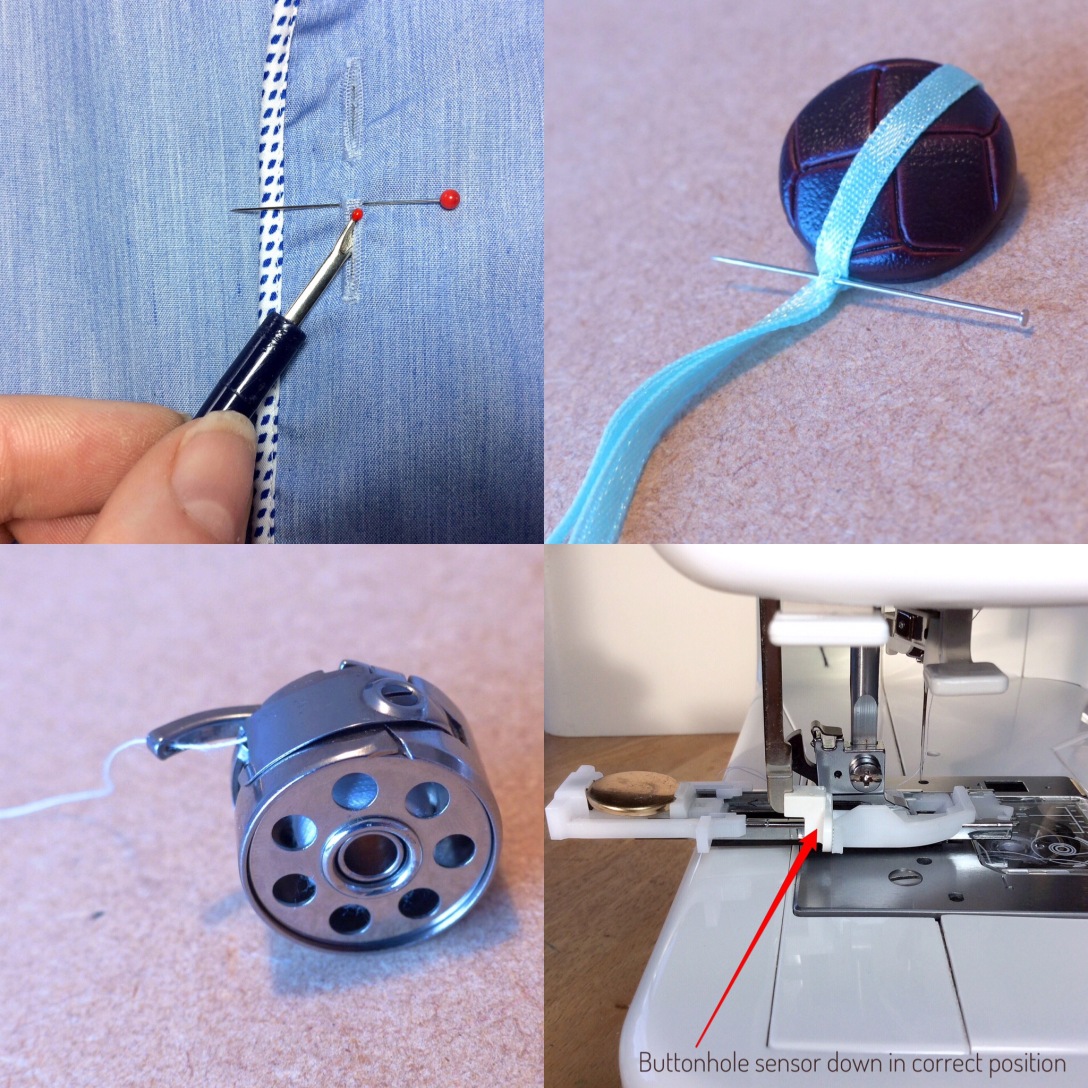
Especially if you haven’t got an automatic buttonhole foot, or if your buttons are domed, a good way to measure the length of a button is to get a narrow tape or ribbon and wrapping it around your button, pin the ends together. This is really good for domed buttons which end up needing a much bigger buttonhole than you might think. Fold the ribbon you pinned in half and then add a small amount of ease of about ⅛”, maybe a smidge more … that will be your finished buttonhole length. If you were to use a domed button in a long foot attachment I suggest you measure the button and then find a flat one of the same diameter as the length that you measure and place that in your attachment instead to get an accurate final buttonhole length.
Finding the Correct Buttonhole Placement…for you!
Patterns always mark the buttonholes but, as we are all different shapes, that spacing might not be the best for you. Before you start sewing your buttonholes, try on the garment and mark the widest point of the bust on the button band – here marked with a red pin. If necessary, you can also mark the widest tummy point too. This means you need buttons at those points to prevent gaping.

Using the bust mark (and tummy mark, if used) as a starting point, work out the spacing of your other buttonholes, between 3 and 3.5 inches or 7.5 and 9 cm. This way you will have a shirt or shirtdress which never gapes! If you have the Simflex Buttonhole Gauge, a tool I absolutely swear by, it makes it so much easier to quickly determine!

Sew a Hidden Button!
The lovely Jane of Handmade Jane gave me a fantastic tip about sewing inward facing buttonholes in any area of remaining gape, i.e. sewing them on the inside of the button band so it’s invisible from the front. Genius! You can find her whole post here.
Marking the Button Position
Then comes the button position marking. I always do this after I’ve cut all my buttonholes. Laying my garment over the ironing board, I overlap the fronts aligning the centres and I poke a pencil through the end of each buttonhole to make a little dot on the other front…and then it’s just a matter of sewing on the buttons.
Double-Stitching instead of Topstitching!
Does your machine struggle with sewing buttonholes in topstitching thread? Mine does – instead I use regular thread that matches my topstitching thread and sew the buttonhole twice, the second directly over the original.
Practice on a Fabric Scrap!
Using an offcut of your projects fabric, just practise till you’re satisfied you feel confident and, above all, don’t rush! Remember sewing is something we do for fun!
Still Not happy? Do you need to Adjust Bobbin or Thread Tension?
Regarding machine and stitch settings, it’s really important to get your bobbin and thread tension right. No lower thread should be showing from the front at all so a tighter bobbin or thread tension is essential. More modern machines come with automatic tension settings, or comprehensive tension adjustments – check your own User Manual and play around on a scrap piece of fabric.
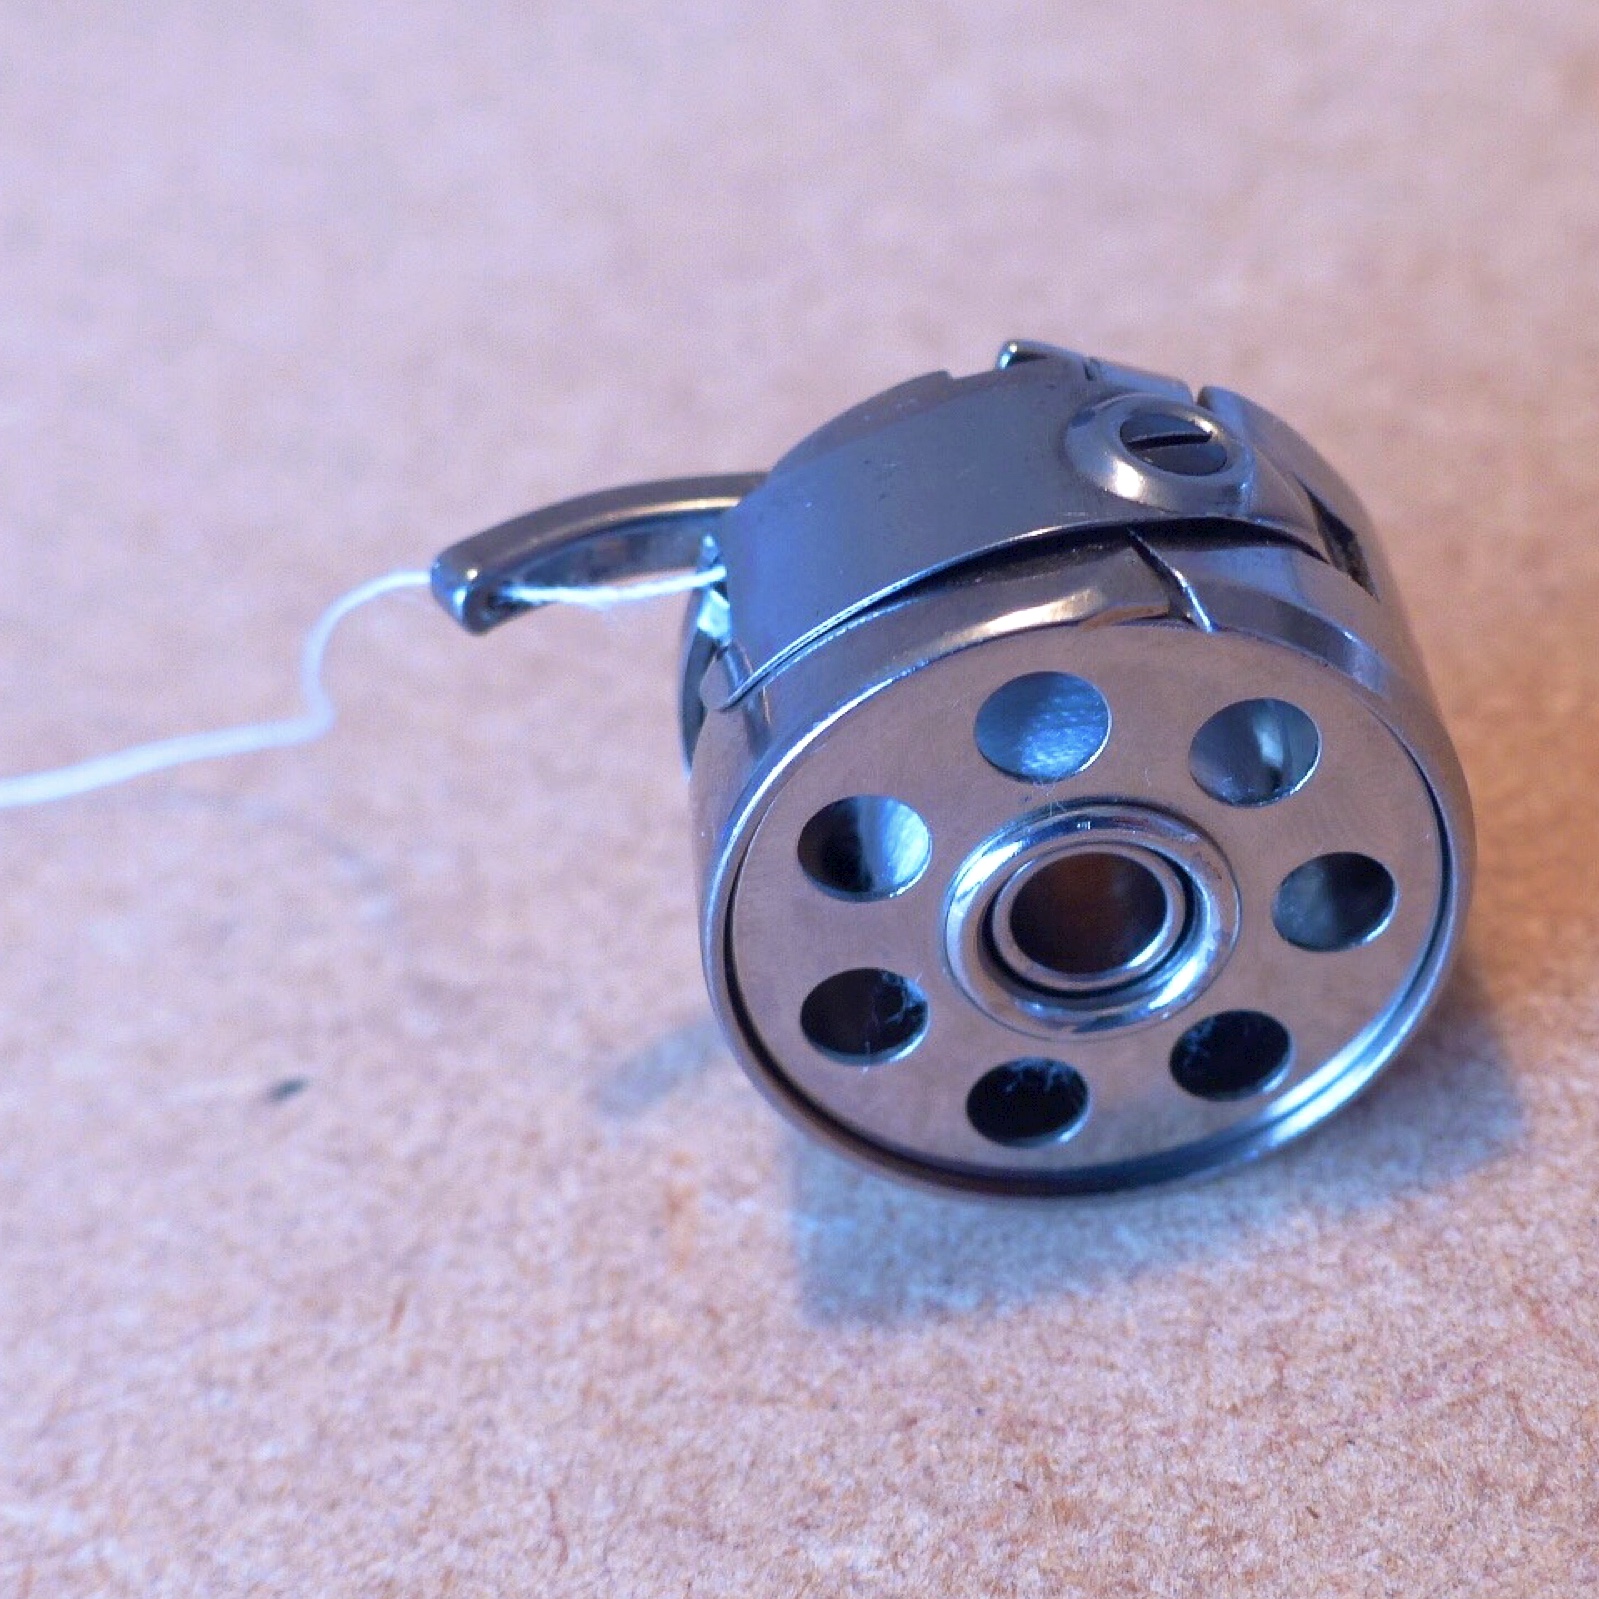
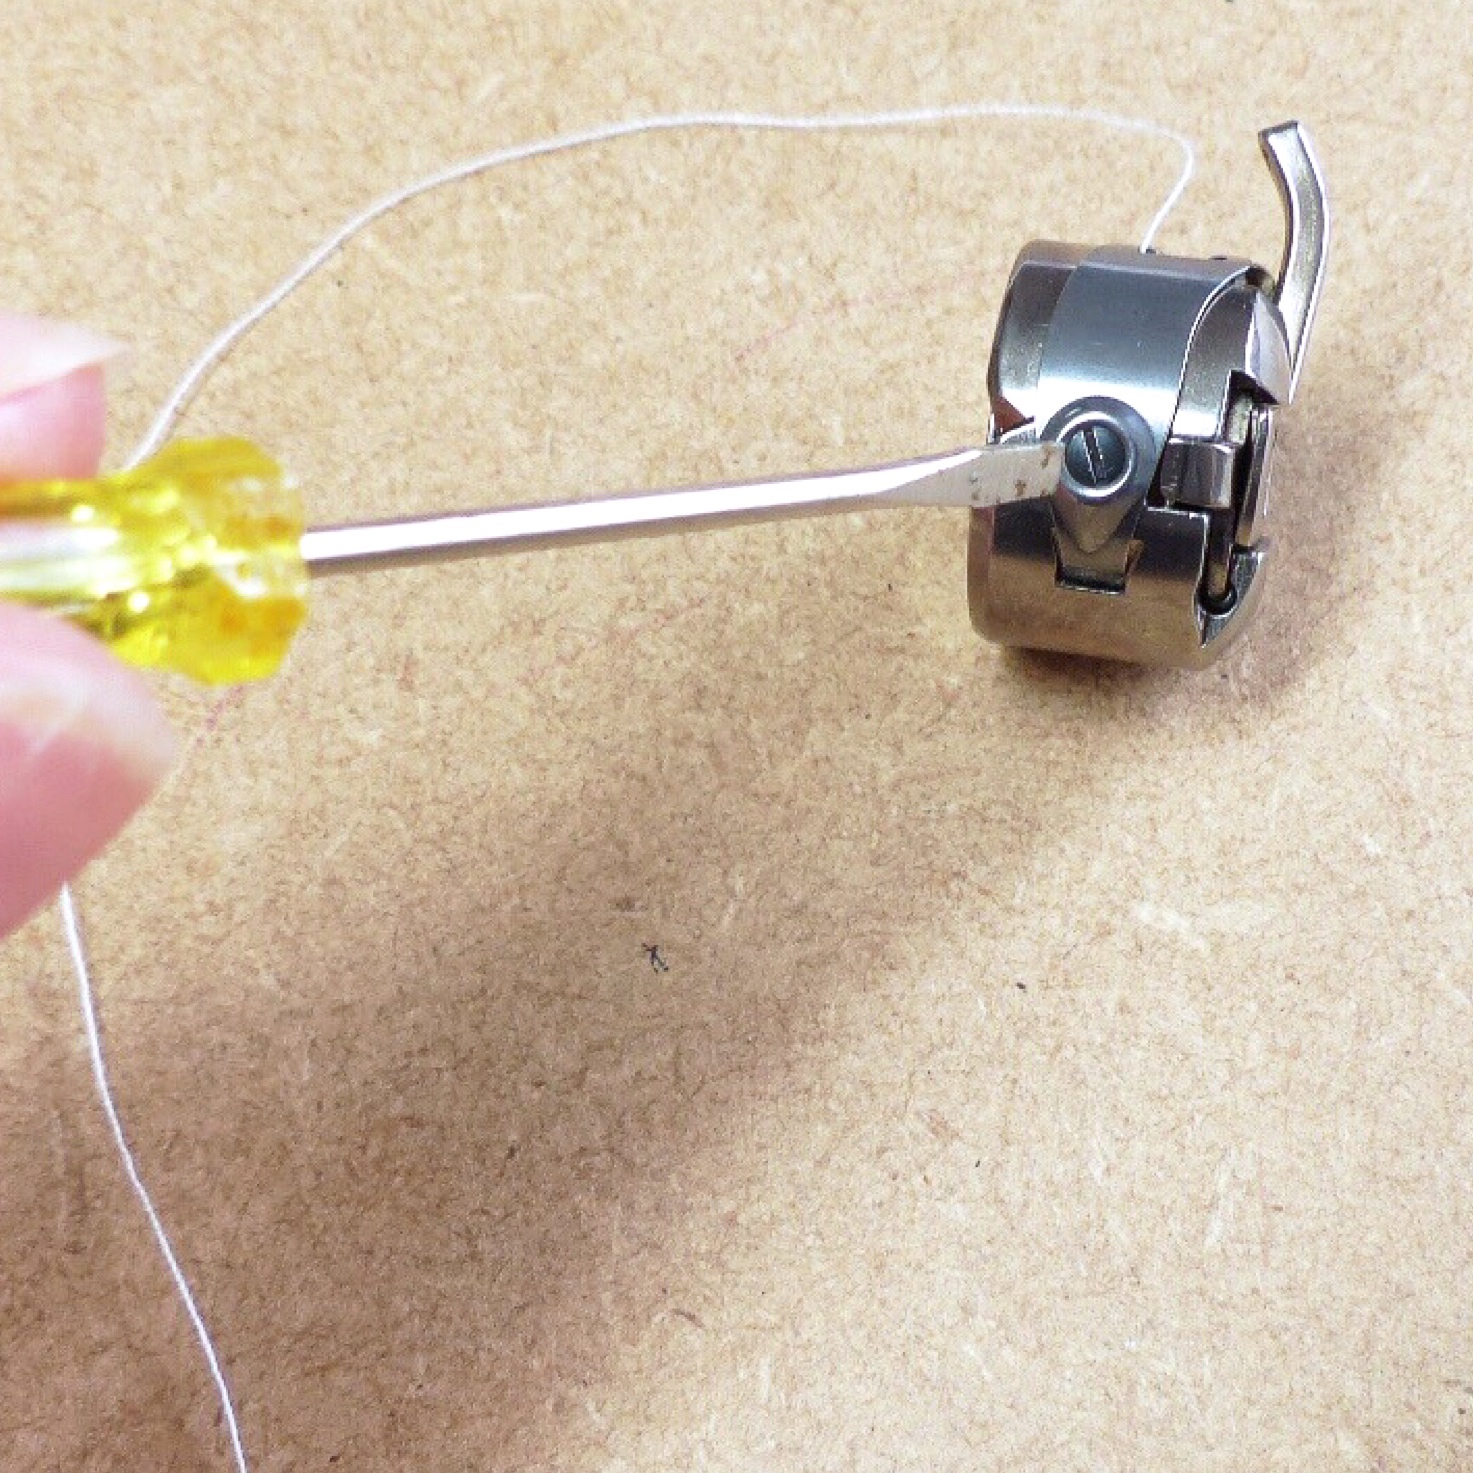
However, on Diane’s Bernina there is a small hole on the little arm of the metal bobbin case that she needs to pull her thread through to create a tight tension. If you don’t have this you should be able to use a small screwdriver to adjust the tension on the case itself.
Cutting Out your Lovely Buttonholes!
Assuming you’re happy with all of your finished lovely new buttonholes, you now have to cut them open. You can either place a pin at one end as a stop and use a seam ripper or use a buttonhole chisel and a wood block.

So, until next time, I hope this was helpful (please do leave your own tips for others in the comments!)

For more regular chat, you can find me on Instagram at @sewsarahsmith
Disclaimer : Not a sponsored post. Post contains some Affiliate Links – if you chose to purchase via an affiliate link, you will not be charged any extra but I may receive a small commission. Sarah x

My Amazon Storefront has a collated collection of my favourite must-have sewing tools, including the ones mentioned in this post – see HERE

[…] a quick add to say that this was the first time I used my chisel to open the buttonholes. I’m a total convert now! Just, y’know put something underneath to protect your […]
LikeLike
[…] with lots of options including a soft collar, a ruffle hem band and several sleeves. Whilst I like doing buttonholes, I decided to use the Prym range of plastic ‘Love’ snaps, which I thought added a fun […]
LikeLike
[…] also to Diane of Dream Cut Sew for her contribution to the buttonhole post and to Helen of Helen’s Closet for her Indie Shirtdress […]
LikeLike
[…] buttonhole on my new sewing machine sewed them all very neatly 😊 I found the blog post that Sew Sarah Smith put together really helpful too […]
LikeLike
[…] on from our Sewing Buttonholes : Tips n Tricks! post, today we bring you the second instalment of our #sewtogetherforsummer posts to help you […]
LikeLike
[…] some buttonhole tips and tricks? We’ve got a designated buttonhole post for […]
LikeLike
[…] fun self-covering my buttons using my new little Prym gadget and putting all I learned from our Sewing Buttonholes : Tips n Tricks post to get a lovely finish to my buttonholes. This dress needs another button at the top but I’m […]
LikeLike
That’s half the battle won then! X
LikeLiked by 1 person
Thank you! I’m waffling, yet determined….. 😉
LikeLiked by 1 person
It’s funny how we sometimes get more cautious as we get older isn’t it! Good luck! Xx
LikeLiked by 1 person
I’m one of the trepidatious ones. Years ago I made them without hesitation (even bound buttonholes), so I’ll just have to channel the much younger me and get on with it! 😉
LikeLiked by 1 person
Thanking you! 😊🤗
LikeLiked by 1 person
Thank you for this, it looks really helpful 😊
LikeLiked by 1 person
Xxxxxx
LikeLike
This is the best guide on making buttonholes ever! love how it’s been put tohether. xxx
LikeLiked by 1 person
You’re welcome Jane – thank you for the brilliant tip in the first place! X
LikeLike
Super useful comment! Thank you! X
LikeLike
Your tips on placement are genius; thanks. I’ve always just put the buttonholes as marked on the pattern, but of course, buttonholes can be altered for a custom fit, just like anything else.
A word of advise for newer sewists; buttonhole stitching can often be carefully removed in mid and heavy weight fabrics, especially if you are going to put another, better buttonhole on top. The new stitching and the button itself will cover any minor fabric damage. If working with lightweight fabric, removing buttonhole stitching can cause serious damage, so you may opt to live with a less than perfect buttonhole rather than try to remove it.
LikeLiked by 1 person
Super useful post Sarah and thanks for including my secret buttonhole tip! x
LikeLiked by 1 person
Thanks in no small part to your good self! I haven’t found it, no. But it is important so I shall keep looking until I do find it! I’m sure I’ve got a pause button too somewhere but I haven’t found that either!! 😂😘
LikeLike
Love it, what a comprehensive and informative post….have you found your reset button yet? Still seeking mine. xx
LikeLiked by 1 person
Oooh that’s interesting! Do you use the water soluable Stabiliser on your pieces instead of regular Stabiliser or as well as? I like the idea of not having to stabilise pieces in the regular way and am now off to research water solvable stuff!!! Thanks Kathleen! 👌🏻
LikeLike
I’ve discovered (through someone’s kind advice!) that making a “sandwich” of 2 strips of water soluable Solvy stabilizer with my fabric in the middle helped me make the best buttonholes ever and if I have the right colour around – Guttermann’s silk thread – guarantees perfection 🙂
LikeLiked by 1 person
Diane it’s been great! I’m truly honoured you agreed!!!! And 😂it’s either the reset button or the ‘sod it I’m switching off for the day button’ we need isn’t it!! 😘😘
LikeLike
I know exactly what you mean! I think if you’re sure your tension is right so only the Bobbin threads show underneath? I sometimes put a small dab of FrayStoppa there too which helps. But, let’s face it, if it’s to the underside only we probably shouldn’t care too much eh? 😉
LikeLiked by 1 person
It was lovely to be part of your blog Sarah! Thanks for having me….
Now if only I could find my own reset button…. ^^
LikeLiked by 1 person
Thank you Wis! I’m sure you’re a buttonhole expert too!! 😘
LikeLike
I always find my button holes look messy where I’ve cut them on the inside if that makes sense – any tips?
LikeLiked by 1 person
Such an interesting post. Great tips and techniques. Thanks for sharing, Sarah.
LikeLiked by 1 person