

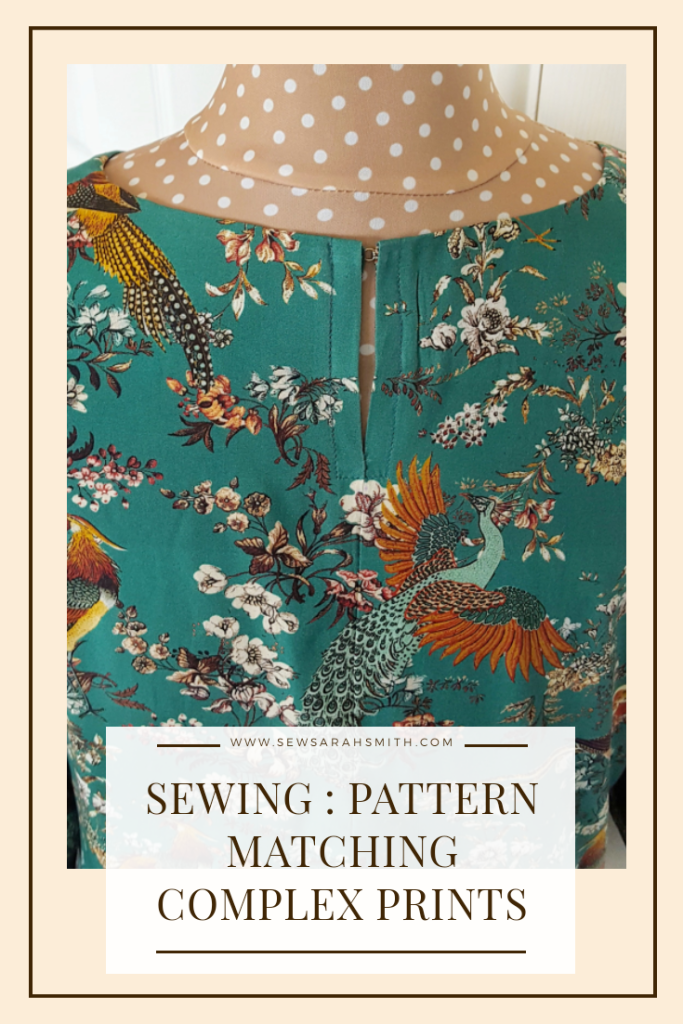
I’ve recently made a couple of tops using fairly ‘loud’ and complex prints. My lovely husband chose the fabrics and, not unsurprisingly, the issue of pattern matching said print never occurred to him. Which got me thinking : how often do we disregard a beautiful but complex print when purchasing fabric because the idea of pattern matching it puts us off? So I thought I’d show the foolproof (i.e. it works for me!) method I use for matching seams, so you too can be liberated in your fabric choices!
Pattern matching fabrics with a regular and repeating pattern, like stripes or checks is one thing – the pattern itself actually helps in the pattern matching process. Here I’m going to demonstrate using this busy, not quite so helpful, print at a centre-back seam. (I recommend you read through fully at least once before attempting to follow it in ‘real life’!)
(If you’re looking for guidance on pattern matching smaller areas, e.g. a two-piece/cuffed, patch pocket, I cover that here).

Let’s start by taking a a look at the tools I find useful…
1. Useful Tools
Fork Pins. I wax lyrical about these bad boys at every opportunity. If you don’t have any in your kit, I highly recommend you get some. Vitally, these pins really ‘lock’ your seam and reduce shifting when sewing. I got mine here.
A Rotary Cutter. I don’t usually use shears to cut out shifty fabric as the blades tend to ‘lift’ the fabric when cutting causing distortion. The key to getting a perfectly matched seam starts with a clean cut – I use this 28 mm rotary blade.
A walking foot. Some, more advanced, machines have these inbuilt. Mine doesn’t. A walking foot ensures that both layers of your seam feed underneath the foot at the same speed ensuring that your pattern stays aligned!
A seam gauge and a Hot Hem presser – you need to be able to ensure your seam allowance widths are completely accurate!
Pattern weights are helpful but not absolutely essential. Mine are from Foxglove & Field.
(N.B. I have a handy new Amazon shopfront where you can find all the tools I routinely reach for in my own sewing room HERE).
2. Lay out Your Fabric on the Flat
When it comes to your cutting layout, laying your fabric out flat rather than on the fold, is essential. The fabric I used, a viscose, tends to shift and distort a little when cutting out anyway, so it’s usually my preferred method. Make sure the right side of your fabric is facing up.
3. Mark your seam allowance on your pattern piece
Accurately draw in the seam allowance on your paper pattern piece. Carefully press it under at this line, then unfold and lay it back out flat again. You just want a visible line and a good crease at this point.

4. Cut out the left hand side
Place your pattern piece, right side up, onto the fabric and consider your print. Try and find some areas where the print has sizeable sections to it. The print I used has birds and flowers on it so I was looking to pattern match the largest of those. Make sure your paper pattern is laid out fully and is completely flat and look, not at the edge of your pattern piece, but at your drawn seam allowance line when determining where to place it. (Measure from the selvage to make sure your pattern piece is also on the grainline, as you would normally).
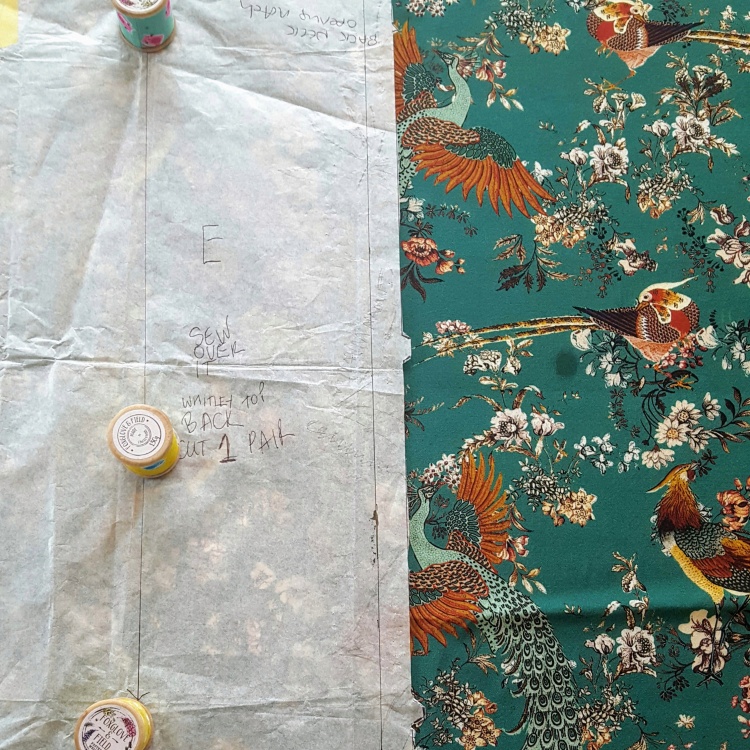
Then pin and cut it out. (As you can see I have cut my notches outwards – this is in case the fabric frays to make it less likely I’d lose them!)
5. Fold under and press the seam allowance
Take your cut out pattern piece and very carefully fold under your seam allowance. Here I used my hot hem presser – and double-checked it with a seam gauge – whilst pressing to ensure it accurately measured 5/8″ down its whole length. And not a mm less or more at any point.

5. Place your Cut Piece and your Paper Pattern Piece onto your fabric together, side by side
On the left hand side is the piece I have just cut out with its seam allowance pressed and folded under. I have placed it directly over the same pattern repeat on the flat fabric so that it matches up accurately. (I have turned over a section so you can see there are two layers here – my cut pattern piece and the fabric underneath it. They are completely aligned). Place your pattern weights to hold these two layers of fabric together down the folded length of the seam allowance – as pictured – so the two layers of fabric don’t shift in this area.

Now fold under the seam allowance on your paper pattern piece (using the crease you created earlier) and flip it over, ready to cut out the right hand side.
Lay it down on the fabric so that the folded edge of your paper seam allowance butts up against the folded edge of your left, cut, fabric pattern piece. Like so…

6. Pin your right hand paper pattern piece in place
Keeping everything as it is, pin your paper pattern piece to your fabric making sure all the while that the folded edge of the centre back seam stays butting up against the folded edge of the left hand fabric piece. I even pin the folded edge in place at this stage.

7. Get ready to cut … but don’t do it yet!
Once your right hand side piece is all pinned and you’re confident everything is aligned as it should be, carefully remove your left hand fabric piece off the table (making sure you don’t disturb the fabric underneath as you do so!)
Now UNPIN AND UNFOLD THE SEAM ALLOWANCE of your paper pattern piece and re-pin that section so it is laid out fully and entirely flat – you want to make sure you don’t accidentally cut out your right hand piece without its seam allowance!
8. Now cut out your right hand piece
It would have been the complete pits to have cut out your second piece without its seam allowance wouldn’t it! So you’re really glad you read the bit above and unfolded your seam allowance before you cut out aren’t you? Haha, just checking!
Once cut, take your right hand piece to your ironing board and press its seam allowance under, again like before, use your hot hem presser and/or your seam gauge to make sure that it accurately measures 5/8″ (or whatever your seam allowance should be) down its entire length. Don’t skip this bit, it comes in mightily helpful in a minute!
Now place your two pattern pieces, both with their folded under seam allowances, and lay them together side by side and double check that everything matches as it should. It’s very gratifying to see it at this point and hopefully will make you feel more confident taking it to your sewing machine – look what you just did – looks good, right?

9. Pin, Pin and Pin Again!
If your pattern calls for it, go ahead and separately serge/overlock the edge of your seam allowances (i.e. not together! Separately!)
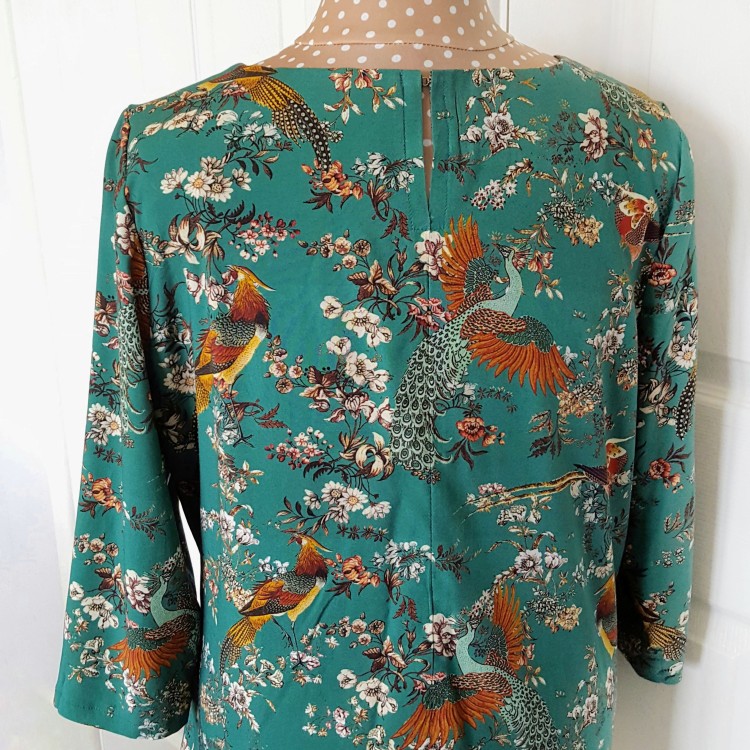
Now we’re going to sew the seam together and this is where your pressed seam allowance line now comes in helpful … in two ways. One, no matter how much allowance you’ve just serged off (and for this pattern which has a keyhole opening at the neck, you don’t want to take off more than the teeniest sliver), you have a handy reference mark when it comes to sewing the seam together.
Two, it also helps when pinning. Preferably using fork pins, now pin your seam allowances right sides together. One at a time, insert the pin through the creased seam line, then take a look at the bit you’ve just sandwiched together. At the point you’ve just pinned, is the pattern completely matched? Readjust your pin a little if necessary. Continue to do that along your seam length, checking with every pin you insert that it hits that right spot on both layers of fabric.
Use lots of pins. Lots and lots of pins.

10. Baste and Sew…
Baste the seam together, ensuring that you stitch directly on that pressed seam allowance line. Baste by hand or hand crank over those pins with your machine, removing the pins (by raising the foot with the needle in the down position) immediately after you’ve sewn over them (if you leave the pins to pass completely under your walking foot, you run the risk of causing distortion or pulling).
Open it up and check. Are you happy? Really, at this point hopefully everything should have come together nicely. (In the unlikely event it hasn’t, just unpick the areas where they’re slightly ‘off’, re-pin and re-baste).
Now sew with your regular stitch length – making sure you sew exactly over your basting stitches.
11. Do a Happy Jig, ‘Phone your Friends and Post on Instagram!
Haha, hopefully you’re a bit pleased with yourself right now! No matter how many times I do it, without fail, I get a bit giddy! It’s sooooo satisfying. I mean, it’s completely bonkers because nobody else but your fellow stitchers will ever really notice what you’ve just achieved – that’s the beauty of a well-matched seam, it’s pretty much invisible. But you did it, and that’s what counts!
If you follow this tutorial, I’d love to see how you got on! Do let me know if I need to clarify anything. If you’re on Instagram, you can tag me at @sewsarahsmith or … leave a comment below!
Until next time, happy sewing!

Like it? Pin it!
Disclaimer – not a sponsored post – all items mentioned in this post were purchased by me (except the pattern weights, which were received as a promo item). Post contains some Affiliate links; if you choose to purchase via an affiliate link, you will not incur additional charges but I may receive a small commission. Sarah x
Latest from the Blog

Sewing Buttonholes : Tips n Tricks!
Struggling with sewing buttonholes? Here’s a post full of tips and tricks to get you confidently sewing buttonholes; to give you…
Keep reading
Sewing Collars : 10 Tips ‘n’ Tricks!
Following on from our Sewing Buttonholes : Tips n Tricks! post, today I bring you our Top 10 tips to stop you…
Keep reading
Happy Crafting : Sewing Luna Lapin
Hello again! If you read my last post, you’ll know that my sewing took a back seat last year. But entering…
Keep reading

Hope it works out for you!
LikeLike
Thank you Sarah , I was struggling with matching my fabric but now having read your instructions , I hope it will be a lot easier.
LikeLiked by 1 person
Thanks Suzanne, I’m sure you will! Give me a shout if anything needs clarifying…just take your time with it. (Plus, how lovely is your son!)
LikeLike
Thank you so much for this Sarah. I’ve just ordered some Lady McElroy Hydrangea lawn (Christmas present from my son!) and wondered if I’d be able to pattern match it properly. I feel much more confident now after reading your method!
LikeLiked by 1 person
[…] I still went all out to pattern match that centre back seam – I have a full tutorial on how I do that HERE […]
LikeLike
[…] the pattern on the centre back seam, and it’s come out satisfyingly well – I recommend Sarah’s tutorial if you want to become a pattern-matching […]
LikeLike
[…] As I say, it has two neck finishes – a round and a V. I pattern matched the centre back seam on all three of my versions. I belatedly realised (after sewing the first one) that if you’re doing the V neck version, there’s really not much need for the neck opening at the back; you could get rid of the centre-back seam altogether. However, I quite like the neck opening as a design feature and so kept it with all three. (If you want to see how I pattern match busy prints like this, I’ve a step-by-step tutorial on it HERE). […]
LikeLike
Really great post, Sarah! I avoid prints in general as they don’t match my style, but I do wish I had your tips when I was on the Sewing Bee, with the infamous cherry dress :).
LikeLike
Thanks Janet – I’m thrilled you found it helpful; wishing you lots of well-matched seams in the future! x
LikeLiked by 1 person
Love this, thank you. I knew the basics but it never quite comes off for me without a lot of cursing and unpicking. Your tips explain all the bits I was getting wrong!
LikeLiked by 1 person
Cheers Luv xxxx
LikeLike
Thank you Barbara and that’s wonderful to hear! I hope you all become pattern matching maestros!
LikeLike
this is extremely helpful..thank you xxx
LikeLiked by 1 person
Thank you for such a clear explanation of a complex subject. I’m passing this post on to the members of our dressmaking club.
LikeLiked by 1 person
Anne, thank you!! That fills me with joy, I’m sooo glad you found it helpful! xx
LikeLike
😂 love it! Oh youll live ths Hot Hemmer! I use mine on every single make! Unfortunately I akso have a shocking tendency to use it as a coaster fur my coffee mug so it’s a bit stained … I’d quite like a shiny new one! As for fork pins, you’ll never look back – they’re absolutely fantastic for joining seams accurately too – say at the underarm. xx
LikeLike
The most easy and readable explanation ever! Thank you. I have subscribed!
LikeLiked by 1 person
And I have now just ordered those bendy pins and the ‘hot hemmer’ – I had never heard of that and had assumed it was a dinky little iron 🤣🤭🙄
LikeLiked by 1 person
Thank you Karey! Haha it’s such a good feeling isn’t it! So glad you enjoyed the post; makes me feel all warm inside! xx
LikeLiked by 1 person
Thank you Jill! Such a lovely comment; I really appreciate it! xx
LikeLike
Love it. The bold print helps make it obvious what you are doing. I do a mental jig too, when something tricky comes out just right
LikeLiked by 1 person
Fab – love your instructions as usual. Really well written, illustrated ( photographed 🤭) and helpful. Thanks for taking the time to share. Jill
LikeLiked by 2 people